Steven Powers (SMP): how to
Showing posts with label how to. Show all posts

Adjusting Photoshop Brush Size


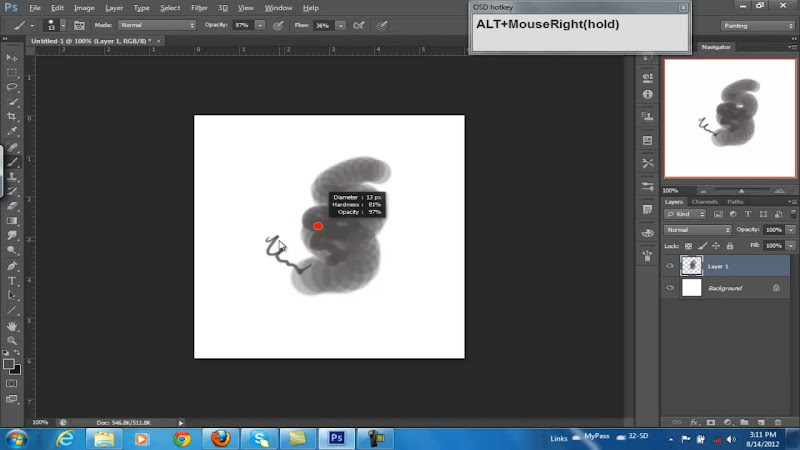
Just a simple tip to speed up productivity. Unlike the traditional way of changing the brush size in Photoshop with the bracket keys, I pass on a shortcut that I learned years back using the "ALT+Right Mouse Click+Dragging" method.  It allows to change the size quickly without reaching over the keyboard (if you are right handed) and adjust the size in faster increments.

Steve


How to Build and Design a CG Workstation


2012-workstation-for-digital-artist


I believe that every digital artist should have a working knowledge of the tools that they use, which also includes the workstation. In this article I will cover the design options and consideration in building my recent workstation.

Blender VSE and Avidemux: How To Rotate Video


This is part of the Blender VSE (Video Sequence Editor) series in which I demonstrate how to rotate a video clip. I also add a secondary method using Avidemux since both methods will produce varying results. If the original clip had not been a MOV file I could have used Virtual Dub Mod.

Blender can be found HERE

Avidemux can be found HERE

Photoshop, CamStudio, Blender VSE Synch Issue


Recently I found an issue when I went to edit a video tutorial on Photoshop in Blender's VSE that I had created with CamStudio 2.6. The problem  arose when I rendered the video after editing in Blender VSE. The resulting video was sped up.  I am not sure why it happens but I was able to find a solution or work-around.

Blender VSE - How to Overlay an Image


Adding watermarks to your video is a great way to promote yourself or your product.  In the fourth part of the Blender Video Sequence Editor series I demonstrate the basic technique in adding an image and transforming the aspect ratio along with the placement of the image.

The Gamut Mask Tool Overview


This is a free online tool for creating Gamut Masks which aids in refining a color palette. This tool was created by Richard Robinson and is hosted on his site Live Painting Lessons.com HERE. The Gamut Mask can be either printed or taking a screen shot with another free tool Greenshot and saved as a PNG (PNGs have more detail than JPEGs). From there you can easily create a color palette in Photoshop or GIMP (not shown here.)


JPEG or PNG for Print


Which image format should you use for prints ...JPEG or PNG?  This question eventually comes up when we find that our prints don't look sharp.  Or we do a painting at 300dpi, flatten it and send it off to prints.  The reason is usually that you saved it a JPEG format.  Do you know that differences between JPEG and PNG? 

How To Create A Digital Artists Blog


Every digital artist has one thing in common ...the need to display their art on the Internet.  But going about doing that can be somewhat confusing since there are many different avenues and approaches.  Here I will discuss my views and processes of displaying content on various sites, creating online portfolios, linking them together, simple workflows and the use of free and open-source applications that I use.

Blender VSE Part-3: How To Add Fade In-Out Effect


Part 3 of the Blender Video Sequence Editor (VSE) show how to animate the opacity of the image added in Part-2 to create a Fade In-Out effect.

Hope this helps,

-Steve

LINK: https://youtu.be/69KP-8Ezvao

Blender VSE Part-2: How To Overlay Images


This tutorial is Part-2 of the Blender VSE (Video Sequence Editor) series.  This video covers adding or overlaying and image. Overlaying images is useful for adding titles, watermarks or description to your video

Hope this helps,
-Steve

LINK: https://youtu.be/f5uMFrd5El8

Blender VSE Part-1: How To Edit Video


This tutorial is Part-1 of the Blender VSE (Video Sequence Editor) series.  This video covers manually setting up Blender's interface, cutting a video file and rendering out a portion of the source video.

Quick Tip: Why Calibrate My Monitor


Calibrating your monitor.  What can I say?  We all try to get away with calibrating our monitor by eye, but that only works for so long and unfortunately our eyes change.  Not just over the years but throughout the day.  We get use to seeing a certain way and we adapt in different lighting situations.  In the end our paintings, photos or what have you suffer.  Our darks are too dark, the colors are to saturated or the hues just don't look right especially when we go to print.  So we are left to buying hardware to calibrate our monitors.

Quick Tip: Launchy + Dexpot


Just want to introduce some free applications that I was introduced to the other day.  These are great little utilities that can help speed up ones work flow. Launchy is cross-platform while Dexpot is for Windows users who like the virtual desktops that is found in Ubuntu.

COMING SOON! - Blender 2.5 Video Sequence Editor


This is a snapshot of a new tutorial that is on it's way.  In the past few months I have been working on moving from commercial applications to FLOSS (Free Libre Open Source Software) and Blender has been one I have been working with since 2.48. One feature is Blenders Video Sequence Editor (VSE), which is also refered to as the Sequence Editor.  I have done some extensive testing changing options and working through some issues.  I want to show how to set up Blender's interface, add video files, edited them within Blender, add image overlays for titles, watermarks etc, and how to animate some of the properties.  These tasks maybe broken down into multiple parts so you can pick and choose what you need and to minimize the duration of the tutorial.

I hope to have it out within the next week or so,
- Steve

Quick Tip: MyPaint and GIMP Template


I have been working with GIMP a lot lately and also playing with MyPaint. I have seen some very good paintings done with MyPaint and I love the feel of the brushes. But I have always been able to control my canvas size and resolution. But MyPaint doesn't allow you to set either from scratch. This is one method that gets around those issues.

GIMP: How To Add Themes UPDATED

This is an update to the original tutorial on theme. In this tutorial I show how to download, adjust the themes and install them in either version 2.6.11 or 2.7.3.  In the end I preview the new themes and show how to set it as your default so it loads automatically.   The custom themes can be downloaded from GNOME.

Update: Installing GIMP 2.7.3 in Windows


UPDATE-: I add this update to an earlier post on "How To Install GIMP 2.7.3 in Ubuntu and Windows.
I had issues with saving to the OpenRaster extension (.ora) and had to go back and forth between 2.7.3 and 2.6.11 (stable version).  I went and backed up my .gimp 2.7.3 folder and uninstalled Gimp 2.7.3 with RevoUninstaller.  Then I reinstalled it with the version I downloaded from Gimpusers.com HERE.  I verified that it worked by exporting as an .ora file.  Then I copied my themes and brushes into the new folder.  Not sure what happened, but it is an experimental version.

Hope this helps,

-Steve

How To Sketch: Sketching The 4 Step Method


Overview: 
Sketching is a vital skill that enables one to quickly capture a vision or idea. Sketching is normally the first place that artists start out and is also the basis for most projects. Even movies start out with storyboards that are a sequence of sketches. Most often, but not always very rudimentary ones at best. Sketching is very important for digital artists for that reason. It is utilized in all media. Sketching is art in it's simplest form but can be taken to a very high degree of detail. Their is a difference between sketching and drawing where drawing is more detailed. These terms are quite often used interchangeably.

Quick Tip: Animation


This is just a quick thought for those who are aspiring animators and are just starting out. Look for the extras on DVD / Blu-ray discs.  They will often have "Behind the Scenes" footage showing the process that they went through in making the film.

GIMP: How To Add Themes

Adding Themes to GIMP (2.7 +2.6) is rather simple once one knows how. This tutorial covers the steps and allows one to change the working environment of GIMP quickly. All that is needed is the new version of GIMP 2.7.3 and custom themes downloaded from GNOME

With custom themes you can go from the default the to a custom theme.